Search This Blog

Friday, December 11, 2015

A Wallet for My Man

Not only do I sew, but I also enjoy tooling leather. My boyfriend's wallet is starting to get a bit raggedy, so I made him a new one to give him for Christmas. I've made him a couple trifold wallets before, but this time he wanted a long wallet. He told me what he wanted on it, and I found pictures that he liked and made them the right size to fit on the leather.
Then I traced the designs onto the leather.

Here it is nearly finished. His initials are on either side of the top part of the cross.

I decided to add a background texture behind the celtic knot side.

Can't forget a maker's mark. It's in the lower left corner

Here it is all dyed up. I decided to resist the dye over the tooled patterns to make them stand out.
Here is the finished product :)


Sunday, November 29, 2015

Bad blogger...

I know, I've been a bad blogger, and I am sorry. I haven't been able to do much sewing, especially here at the end of the semester, but I have been doing some loom knitting. I've made a few hats, some cowls, and a whole pile of boot toppers.

I plan to make another (smaller)cross-back apron for my youngest cousin, who wants to be a baker. I figured it would make a nice Christmas present.

I have also been bequeathed with some ripped-up jeans and too-small shirts from a recent cleaning of my boyfriend's closet. The shirts are quite nice, so I figured I could do something with them rather than give them away. The jeans would have gone in the trash anyways, so I scooped them up to be reused.
I have some shirts of my own that I need to refashion, as well, since they are too tight across the shoulders.

So I have plenty of projects lined up and waiting for me whenever I find the time.


Saturday, October 24, 2015

An 1860's Gathered-Front Day Dress: Part Four

Part Four: The Completed Dress

I am very pleased with the results:
Please excuse my awful hair. It needs a trim very badly… Look at the dress not me haha :P
Here I am wearing it over my cage crinoline and two petticoats, and my corset of course. I love the way the skirt hinges out from the waist to help create the bell shape. 

Wednesday, October 21, 2015

An 1860's Gathered-Front Day Dress: Part Three

Part Three: The Skirt

I knew I wanted a very full skirt for this dress, so I used roughly 5 and half yards of fabric. There are two seams, one on each side. I also took advantage of the selvedges and used them as the waist and hem edges. It makes the print go the "wrong" way (Horizontal instead of vertical to match the bodice), but I'm not overly concerned about it. I faced the hem with a wide strip of fabric instead of lining the whole skirt. I decided to cartridge pleat (or gauge) the skirt to a waistband and then sew the skirt and bodice together. I wanted a dogleg closure, so the bodice closes up the center front and the skirt closes on the right.

Here's the skirt pinned to the bodice. I didn't take pictures of the whole construction process, unfortunately. It was all a huge mass of fabric, anyways, and would have been difficult to photograph.

Sunday, October 18, 2015

An 1860's Gathered-Front Day Dress: Part Two

Part Two: Bodice Construction

The bodice is coming along nicely. I decided to sew this dress mostly by hand. The fabric is a reproduction cotton print from Maggie May Clothing. I snapped up 8 yards on sale for $6 a yard! It's a fun little print in a color I don't have. I tend to like the color blue…
Here are the two completed front pieces. The bodice closes at the center front with hooks and eyes.
I've been sewing by hand whilst sitting in front of my lowered ironing board. It makes for a handy table  :)

Wednesday, October 14, 2015

An 1860's Gathered-Front Day Dress: Part One

Part One: Bodice Mock-Up

After much deliberation, I decided I wanted to make a less formal day dress for the 1860's. My current blue striped dress is still wearable and serviceable, but it's a bit fancier than what would have been worn day to day for working around the house.

I did a bit of research to find extant, gathered-front dresses from the 1860's. There were plenty to base my dress on, so I got to work modifying my darted bodice pattern to turn it into a gathered bodice with a darted lining. I also wanted the sleeves to be full, but cuffed, similar to a bishop sleeve. So I used the bottom portion of the sleeve from my 1837 day dress, lengthened by a couple inches.
 As I was fiddling around with the sleeves, I realized I could use the top portion of the 1837 sleeve as an epaulet for this dress.

Thursday, October 8, 2015

A Frankenstein Corset Cover

This was my first attempt as a corset cover. It's not very attractive, but really quite useful now that I finally finished it. I padded the area above the bust to fill in the gap that occurs there between bodice and the body.


Front View
Obviously, Miss Busty here doesn't need the padding, but I do :P
The neck and waist close with drawstrings and the rest of the opening fastens with large hooks and bars.

Thursday, October 1, 2015

An Under-Petticoat

To go along with my split crotch drawers, I made a simple under-petticoat to wear over the drawers and under my hoops. It's just two 45 inch panels of fabric gathered onto an adjustable, drawstring waistband. A simple garment, but useful, as I can use it for any time period and with any corset.
Front View
Really, this petticoat could tie in the front or back, depending on the bulk already present from other ties

Thursday, September 24, 2015

Civil War Grannie Panties..I Mean Drawers...

I finally got around to completing my Civil War ensemble with a few behind-the-scenes pieces. Drawers weren't always worn, but were useful for preserving one's modesty in the case of an overturned hoop. So I dug out some white cotton muslin I have in my stash and used this highly informative tutorial to draft some to fit my own odd measurements. The resulting back-closing, split crotch drawers, while rather baggy and unflattering (hence my title :p) are comfortable and will perform their function.
Front view

Wednesday, September 2, 2015

A Cross-Back Apron

My mom recently cleaned out her closet and found an old white cotton bedspread that she gave to me thinking that I could make something out of it. It sat in my stash for a few weeks before I got the bright idea to make an apron out of it.

I love to cook, but I usually get something on my clothes whenever I bake or cook. Because of that, I have been wanting to make an apron for myself to save my clothes from stains.
Cue the bedspread!

I used this free tutorial to make my lovely cross-back apron.

Tuesday, September 1, 2015

Another Vest…But This One is Different

As I have said before I love me some vests! I was looking through pinterest a while back and saw a line drawing of a vest sort of thing that I really liked, so I decided to recreate it in my own way.
Image courtesy of chicstar.com

Monday, July 27, 2015

Another Shirt Refashion

I finished up classes for the summer this past thursday, and have therefore been enjoying a little sewing time :)
I still have a couple blouses that I haven't refashioned yet, so I decided to work on one of those this weekend.
It started out as this crimson silk blouse. It was nice, but simply too boxy for me. Besides, I'm not too wild about the whole double collar thing going on…must have been in style when my mom bought the shirt...So I went to work altering it to make another peplum topsince I love wearing the first one I made so much. 

Saturday, July 4, 2015

A New Civil War Era Corset: In Which I Ramble About Hip Springs

As I said in an earlier post, my first civil war era corset simply wasn't cutting it any more. It was the first corset I had ever made, and was far from aesthetically pleasing, and uncomfortable to boot. So I decided to do a little research into corsets of this era and make a new one. I tried to make this corset from The Lady's Home Magazine, but something went wrong when I was trying to scale the pattern pieces up and enlarge the corset to my measurements. I made a muslin of one half, but the results weren't what I was hoping for, and I didn't want to fiddle with the darn thing any more. So I dug through all my sewing drawers and bags until I found the Simplicity pattern I had used to make the corset the first time. I had cut out the pieces from muslin (but I forgot I had… obviously didn't use them to make a muslin the first time), so I used those to fit the corset to my body much more accurately. I used the same canvas left over from making my Edwardian Corset, as well as some of the leftover spring steel boning. The spiral steel boning, as well as the busk, I cannibalized from the original. I had a little bit of bone casing left over, but not enough to complete the whole corset, so I improvised by using some bias strips I had on hand.
The inside of the corset. The pink striped casings are the ones I improvised from bias strips.

Tuesday, June 30, 2015

Dressy Dresses

I have made a couple of dresses for dressier events.
I made this dress for Homecoming my junior year of high school

Friday, June 26, 2015

Dresses

I also enjoy wearing dresses from time to time. I used to have a couple more that I had made, but they got a little small for me, so I donated them.
This dress is made from a lovely, soft, flowy rayon. I made it using a pattern I found in an issue of Threads magazine. I will admit that it's a bit revealing to wear on its own, but it works great as a swimsuit cover up.  

Monday, June 22, 2015

Skirts

I don't usually wear skirts, but I do like to every once in a while.
You might recognize the fabric of this skirt from one of my vests in a previous post. That's because I made this skirt to match my vest. Worn together, I have a fairly professional looking outfit. 

I drafted this pencil skirt myself with the help of an online tutorial that I have now forgotten the name of. But the result is great and fits me well.

Thursday, June 18, 2015

One Vest, Two Vest, Three Vest, Four!

I love me some vests! They are great, versatile pieces for layering. I've made four vests so far, and I love them all.
All of these vests have been made from the same pattern pack. I think the pattern was a project runway pattern. This one is made from a pretty paisley cotton print.  

Thursday, June 11, 2015

Civil War Era Skirt and Two Bodices

I made this ensemble versatile for both day wear and more fancy wear. I need to update the fit for both bodices, but the day bodice especially. The skirt is box pleated and lined about halfway up.
*Update* I can wear this ensemble again thanks to my new corset, which, although not period correct, will reduce my waist down to the measurements I had used to make these pieces originally... in a much more comfortable manner…If lacing down to approximately 24 inches is ever truly comfortable.
As you can see, this bodice has quite a small waist…I was still under the impression even when I made this set not more than 3 years ago that I should make my waist as tiny as possible. If I had a more comfortable corset I might be able to wear this set again, but with my current corset for this era, I can't.

The ball gown bodice is a bit more forgiving in the sense that it laces up the back. I stole the lace to use on something else, I think, so I have the bodice pinned to the form for this picture. It looks lovely when I wear it because of the off the shoulder neckline.

Sunday, June 7, 2015

Civil War Underpinnings

Ah, the ubiquitous Civil War Dress. This era was the first era of interest for me way back when I was about 14. My very first dress I made for this era I'm not particularly proud of… It was made out of a purple, shiny, stretchy, synthetic fabric of some sort. It closed up the front with, wait for it, velcro. My hoop skirt was probably the most humorous part of the outfit. My dad had some old bandsaw blades that he lent to me to use as my hoops. I covered the still rather sharp edges with masking tape and attached the two hoops to a makeshift skirt made out of an old sheet. I wore this dress as a Halloween costume. As I was walking, one of the hoops came unattached so I had to carry it. 
I made the rest of the  underpinnings afterwards. I still use the petticoats and the chemise. The corset is a bit small, but I can still wear it.
I purchased this lovely cage crinoline. Disregard the petticoats on the floor...

Here's the crinoline with my two petticoats over the top

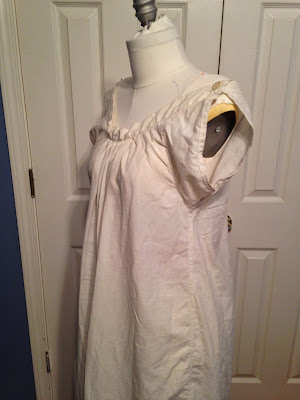
The chemise. It's really quite comfortable, although I think I might have put it on my dress form backwards...


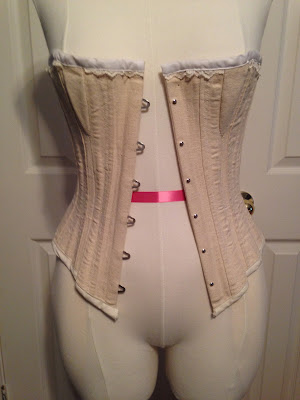
And the corset…This was the first corset I had ever made. I used a simplicity pattern. I didn't make a mockup, so it was much too big at first, thanks to the added ease that commercial patterns include. "Never fear!" thought 14 year old me, "I'll just take it in using additional seams!" So that's what I did. It still gives the shape I wanted. I will admit that at the time I still had a highly romanticized view of corsets. I was convinced that I needed to make my waist as small as I could. And at the time I could probably lace myself down to about 22 inches using this corset. But as I have matured, I know now that corsets, at least during this particular time period, weren't used for tight lacing. They were used for a slight reduction in waist and support for the bust. This being said, I had to add bust gussets to this corset to make it even remotely comfortable to wear nowadays. The hips are too small now, too. But if I lace it only just snug, it's not too bad. 
Just goes to show how I have improved as a seamstress. Look at this corset and look at my most recent corset and it's hard to tell that they were made by the same person. I might even make a new corset for this era now that I know how to fit them properly. 

Thursday, June 4, 2015

Late 1830's Dress

I like the look of this dress. The skirt is quite full, as well as the sleeves.
Front view. I love the sleeves :)

Side view. I didn't take a picture of the back because I couldn't get the dress closed over my dress form. It fastens up the back with a multitude of hooks and eyes.

This is a detail of the cartridge pleating, also known as gauging, used to gather the large amount of fabric in the skirt to the waistband.

Sunday, May 31, 2015

Late 1830's Underpinnings

I made this beautiful corded stays/corset to wear under my 1837 day Dress, but it honestly doesn't work the way I hoped it would. Because there isn't any boning (except for one bone on either side of the back opening and the busk in front) the petticoats and skirt cut into my waist…not comfortable. To top things off, I modified the bust darts (thinking they would be too large) to the point that they gave me a strange shape. You can see that I tried to remedy that by adding additional fabric to the bust gussets. Honestly, I am frustrated with these stays to no end. I like them (and spent quite a lot of time cording them) but I just can't wear them in the way I had imagined. 
Front view

Side view, and a closeup of the cording

Back view. It's also a pain to get into because the lacing is in the back and there is no separating busk

Here is my corded petticoat. It works just as well as I hoped it would, thankfully. I made it out of some wide muslin I had leftover from some other project. The cording is some very thick hemp twine.

Here is the corded petticoat with my two other petticoats over the top. I made these petticoats for my civil war dress originally, but with one modification to make them one length all around, they work just as well for an earlier period. They are made out of some old sheets… the top one is cream colored while the one underneath is made from some red satin sheets. The red one probably isn't very accurate, but it does its job and that's all that matters.


Wednesday, May 27, 2015

Two Federalist Era Dresses

I've made two dresses from the Federalist Era, as it was known here in the United States. The pattern I used is Past Pattern's Circa 1796-1806 Lewis & Clark Era Front Closing Gown. I modified the pattern for the second dress to make it an "apron front" closing gown.


Saturday, May 23, 2015

Federalist Era Underpinnings

I made a set of underpinnings to go with my two front closing gowns, which will be featured in my next post.
This chemise works well for most time periods. It's constructed with simple geometric shapes. The neckline is adjustable since there is a ribbon encased in the hem.

The underarm gusset

Wednesday, May 13, 2015

Edwardian Ensemble is Finished!

Yay! I finally finished my Edwardian ensemble! I finished the skirt this afternoon and just had to put everything on and try it out. I like the overall look very much. Just some fair warning, I was taking the pictures that are to follow using my laptop, so they aren't great, but will give you the general idea.

Tuesday, May 12, 2015

Edwardian Skirt

I finally received the fabric I ordered to make my 1905 circular skirt. It's such a pretty shade of purple! I decided to bite the bullet and go with a color other than black, brown or gray. It's a mid weight, subtly striped twill described on the website I ordered from as "Mulberry". I do think it could be mulberry-colored, but it reminds me more of a slightly underripe blueberry! It's a rich, beautiful shade of purple no matter what it's named.
See? Isn't it such a pretty color? It's a bit darker in real life

Sunday, May 10, 2015

Button-front Shirt Refashion #3

This refashion uses three shirts, technically. I made a dress with the upper portion of a white shirt, the lower portion of a red silk shirt, and a strip of fabric from the lower portion of a black shirt.
I took inspiration from pictures of color-block dresses, which are quite trendy right now, I suppose.

Friday, May 8, 2015

Button-front Shirt Refashion #2

For my second refashion, I took a soft, purple, short-sleeved, rayon button-up shirt and turned it into a racer-back tank top. I traced the neckline and shoulder lines of an existing tank top while I had the shirt on my dressform. I took the side seams in a little bit right beneath the arms but left the fit pretty loose. I couldn't make enough bias strips to finish the neck and arms with the short sleeves, so I found a bit of black knit fabric to use instead. The armholes gaped strangely, so I ran yarn through the bias trim on the armholes and used them like drawstring casings to make things look better. And voilĂ , a cute, light and breezy summer top.

Thursday, May 7, 2015

Sewing Galore: Button-front Shirt Refashion #1

I have been sewing a good bit since I got done with finals on Friday. I suppose I'll start with the first thing I sewed this week.
A while back, my mom gave me some button up shirts that she never really wore, and they have been sitting in my closet staring at me ever since. Most of them are/ were too big and boxy for my slender frame, although I found one I like to wear under one of my vests... But I digress. Long story short, I decided to refashion some of the shirts into something I would actually wear.

Sunday, April 26, 2015

The Final Belt

I finally got around to finishing the third belt. I cut it out of a scrap of nice soft leather that I had leftover from making a purse. I decided to dye it a darker color. The bottle calls it briar brown, and I liked it better than the other brown dyes I have, for this particular use at least. So I did two coats of dye and two coats of a slightly shiny finish on top. Then I figured out where I wanted to put the snap and made holes with my awl to sew it on.
Originally, I was thinking I might stitch all the way around the edge of the belt since the leather is so thin and soft, but I decided not to. Its softness would have made it extremely difficult to use the tools needed to guide the stitching. I also decided against a lining.
Overall, its a fairly simple belt, but I think it might be my favorite.

Saturday, April 25, 2015

More Posts Coming Soon!

So this semester is almost over for me! Yay! It was a tough one…

But anyways, I will still be taking classes this summer, but a significantly lighter load. That will give me more time for sewing! And posting here! 

I'll start off by posting pictures and descriptions of all my previous sewing projects, both historical and non historical. I'll try to stagger everything out the best I can.

Does this appeal to my readers? I know I haven't got much attention, but I'm hoping that as I post more, people will gradually find my blog.

Sunday, April 19, 2015

Making More Belts

I finished another belt today, view A, with the pointed front and back. I made it out of black twill and some leftover iron on interfacing. It closes in the back with two large hooks and bars. The front dip isn't quite as pronounced, but it might get more noticeable when I wear it with the actual outfit.
Front

Saturday, April 18, 2015

Working on Belts

I've been working on the belts to accompany my Edwardian ensemble today. I completed view B, with the rounded front, out of a purple faux suede material I had on hand.
The poor lighting in my room makes it look more black than purple.

Tuesday, April 14, 2015

Ruffles…ruffles everywhere!

Holy ruffles, Batman!
I (mostly) finished the petticoat for my edwardian ensemble this weekend. All it needs are a couple hooks and eyes for the waistband. I'm debating whether or not I should put a few more hooks and eyes down the back placket, since it seems to gap open a bit strangely. I think it pulls funny because I didn't quite factor in the fluffiness of my drawers when I chose the size I wanted to make…
Nonetheless, I can make it work :) Besides, I'm the only one who will ever see my petticoat, right? ;)
Oh, and I know I promised pictures of my blouse too.

Edit: I decided to use snaps to close the waistband. Snaps were invented in 1885, and were widely in use by the 1900's. I used two snaps at the waist and one to help hold the placket together lower down.

Friday, March 27, 2015

My Edwardian Ensemble so far

 I mentioned earlier this week that my most recent sewing project was a complete Edwardian Ensemble. Here are the pieces I have finished so far.

Here is the chemise, which goes against the skin and protects you from the corset and vice versa.

Wednesday, March 25, 2015

Just a thought

As I was driving home from school this morning (I've got a fairly long commute to college), I was thinking about how sewing is a slowly dying art. There was a time when a woman had to know how to sew in order to clothe herself and her family. Sewing your own clothes used to be a cheaper alternative to buying ready made clothes. Nowadays, however, sewing your own clothes is significantly more costly that buying the cheap, ready made clothes that are available. But sewing is such a useful skill! Just recently, a nice jacket of mine had lost a button. So I took the spare button and sewed it on where the lost one was supposed to be, and while I was at it, I took all the other buttons off and put them back on again using stronger thread. I doubt I will be losing any more buttons off that jacket! I can fix tears, hem up pants, and do many other mends to ready made clothing to make them last longer. The average person without sewing skills would simply throw away an otherwise perfectly fine pair of pants, for example. And when I sew my own clothes, I can alter the fit to suit my body much better.
The art of sewing may be slowly disappearing, but I will surely keep it alive by continuing to do what I do and teach others, as well.

Monday, March 23, 2015

About my Sewing

Hello again!
So, in my previous post I mentioned that I love to sew and that this blog would be dedicated to that aspect of my life.
I learned to sew from my maternal Grandmother when I was about 8 or 9 years old. She taught me each step from beginning to end, and helped me with all the little problems and hiccups in between. We started small and simple, then progressed to more difficult projects. She always asks me whenever we see each or talk to each other if I have done any sewing lately.
My interests in sewing lie mostly in sewing everyday clothing from patterns, but I also find great joy in sewing historically oriented clothing. The project that I have been working on most recently is an Edwardian ensemble. I had nothing from this time period at all, so I had to start completely from scratch. So I bought the fabric and patterns and other notions and got to work on all the layers from the inside out. First I sewed the corset, then the chemise and drawer combinations, and then the blouse. The last pieces I need are the skirt and belt, which I haven't gotten to yet.

About Me

Hello everybody!
This being my first post, I will tell you a little about myself. I am a 20 year old college student who enjoys sewing, reading, singing, leather tooling, and riding horses. Sewing and riding horses are the two activities that I enjoy most for de-stressing during my free time. This blog is dedicated to the sewing aspect of my life.